Creating an NFS share using NetApp Service Level Manager
Goal
Use this workflow to create a NFS share and add an export policy to the newly created NFS share to provide access rights in a specific performance service level and storage efficiency policy using the NetApp Service Level Manager (NSLM).
Prerequisites
1. NSLM 1.2.0 or later must be installed.
1. OnCommand Workflow Automation 4.2 general availability (GA) or later must be installed.
3. The following NSLM user credentials must be available in the Credentials window:
|
Input parameters |
Values |
|
Match |
Exact |
|
Type |
NetApp Service Level Manager |
|
Name/IP |
IP address of the NSLM server |
|
User name |
NSLM REST user name |
|
Password |
NSLM REST user password |
4. A new data source of type NetApp Service Level Manager - 1.2.0 must be available in the Data Source window. Use the REST user name and password as the data source user name and password..
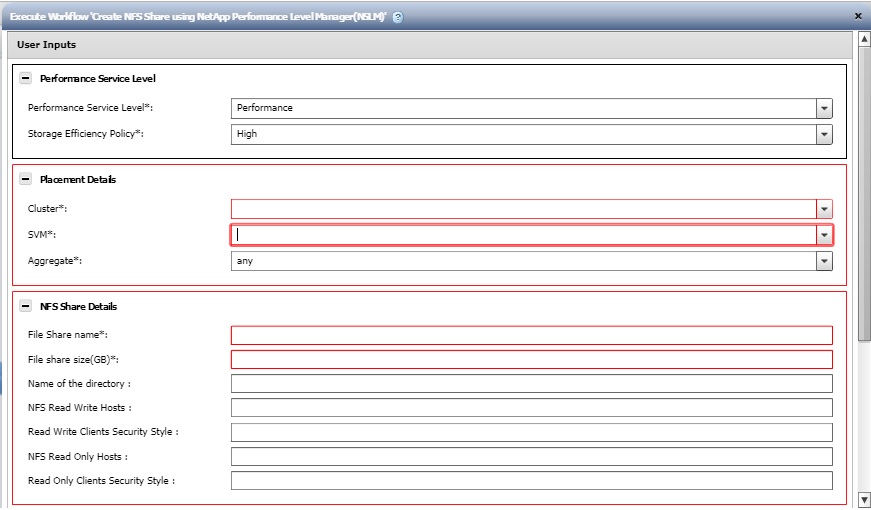
User Inputs
To execute this workflow, provide the required information in the following fields:
1. Performance Service Level
2. Placement Details
3. NFS Share Details
1. Performance Service Level
Select the performance service level and storage efficiency policy for the newly created file share.
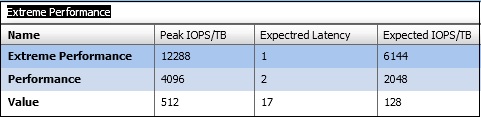
· Performance Service Level* [Mandatory]: From the drop-down menu, select the Performance Service Level based on requirements for input/output operations per second (IOPS)/TB and latency
Note: The drop-down menu also shows the Peak IOPS/TB, Expected Latency, Expected IOPS/TB, and description of the performance service level.
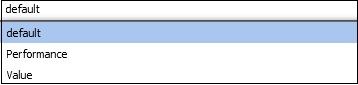
· Storage Efficency Policy: From the drop-down menu, select the storage efficiency policy based on the name.
Note: If "default" is selected, NetApp Service Level Manager will use ONTAP defaults.
2. Placement Details
Select the performance service level and storage efficiency policy for the newly created file share.
· Cluster* [Mandatory]: From the drop-down menu, select a cluster.
· SVM* [Mandatory]: From the drop-down menu, select a storage virtual machine.
· Aggregate* [Mandatory]: From the drop-down menu, select an aggregate.
Note: If the "any" option is selected, NSLM decides with which aggregate the file share will be created.
3. NFS Share Details
Provide the details of the file share to be created.
· File Share name* [Mandatory]: Enter the name of the new file share.
· File Share size (GB)* [Mandatory]: Enter the size of the new file share in GB.
· Name of the directory: Enter the name of the directory on which the new NFS share is to be created. This directory should be under the root directory of the file share. If not provided, WFA will default it to "/File Share Name"
· NFS Read/Write Hosts: Enter the list of hosts that need to be granted read and write access to the NFS share. The hosts can be listed by IP address, subnet mask, netgroup name, or NIS domain name.
< style='font-family:Symbol'>· Read/Write Clients Security Style: Enter a security style for the clients with read and write access.
· NFS Read-Only Hosts: Enter the list of hosts that need to be granted read-only access to the NFS share. The hosts can be listed by IP address, subnet mask, netgroup name, or NIS domain name.
· Read-Only Clients Security Style: Enter a security style for the clients with read-only access.
Result
This workflow creates an NFS share and adds an export policy to the newly created NFS share to provide access rights, in a specific performance service level and storage efficiency policy.