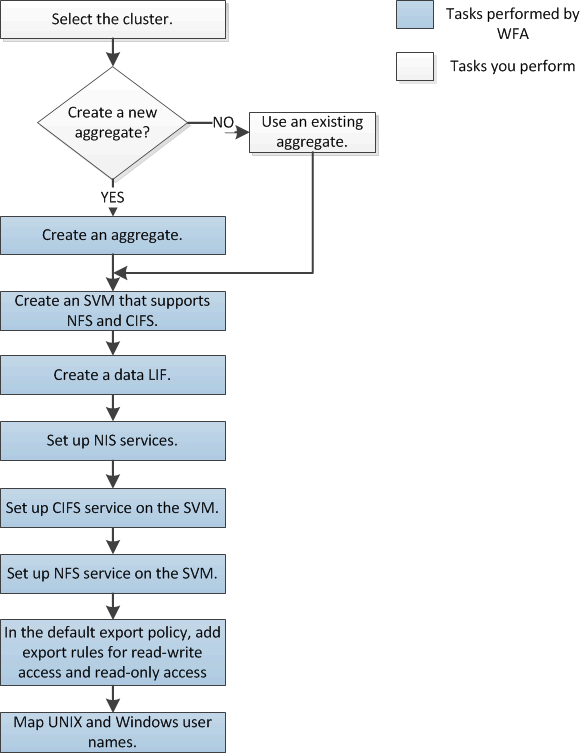
Executing the Multiprotocol Server Configuration workflow enables you to set up CIFS and NFS services on an SVM, in preparation for
configuring SMB and NFSv3 client access to files contained on the SVM.
Before you begin
You must have reviewed the requirements for executing the workflow.
About this task
You should have the following input parameters available for executing the workflow:
- Cluster name
- If you want to create a new aggregate:
- Node name
- Aggregate name
- Aggregate RAID type
- Number of disks to create the aggregate
- For creating the SVM:
- SVM name
- Language
- IPspace name
- DNS domain names
- DNS servers
- NIS domain name and IP addresses of NIS servers
- Logical interface (LIF) details:
- LIF name
- Address
- Network mask
- Home port
- Route gateway
- Failover group
- CIFS details:
- Server name
- Domain name
- Share name
- Export rule details: client match for Read-write access
- UNIX to Windows and Windows to UNIX name mapping details:
- Position of the new mapping
- Pattern to be matched
- Replacement pattern
Steps
- Log in to WFA by providing the necessary credentials.
- Click .
Tip: You can use the filter (

) to locate the workflow.
- Click the Execute icon (
 ).
). The Execute Workflow 'Multiprotocol Server Configuration' dialog box is displayed.
- Select the cluster name.
- Specify whether you want to create name mapping by selecting the Name Mapping check box.
- Provide the aggregate details:
| If you are... |
Do this…
|
|---|
| Using an existing aggregate |
Select an appropriate aggregate from the drop-down list. |
| Creating a new aggregate |
Enter the following values:
- Node name
- Aggregate name
- RAID type
- Disk count
|
- Create the SVM by providing details such as the SVM name, language, IPspace name, DNS domain names, and DNS servers.
Note: The IPspace name is valid only for clusters running Data ONTAP 8.3 and later.
- Provide NIS details such as NIS domain name and the IP addresses of the NIS servers.
- Provide LIF details such as the LIF name, address, home port, network mask address, route gateway, and failover group.
- Specify the export rule details by providing the client match IP.
Two export rules are created with the following configurations:
- Rule index 1
- RO=any
- RW=any
- Superuser=any
- anon=0
- Protocol=any
- Client match=IP address
- Rule index 2
- RO=any
- RW=never
- Superuser=none
- anon=65534
- Protocol=any
- Client match=0.0.0.0/0
- Provide UNIX to Windows name mapping details such as the position, UNIX-Windows pattern, and replacement pattern.
Example
The following example shows UNIX to Windows mapping in the ENG domain:
| Position |
2 |
| UNIX-Windows pattern |
(.+) |
| UNIX-Windows replacement |
ENG\\\1 |
- Provide Windows to UNIX name mapping details such as the position, Windows-UNIX pattern, and replacement pattern.
Example
The following example shows Windows to UNIX mapping in the ENG domain:
| Position |
1 |
| Windows-UNIX pattern |
ENG\\(.+) |
| Windows-UNIX replacement |
\1 |
- Optional: Click Preview to validate your workflow before executing it.
- Click Execute.
You can also schedule the workflow for execution at a later date and time by selecting the Choose date and time for execution check box.
After you finish
You must create a data volume and provide access to the clients by executing the Multiprotocol File Access Workflow.

